Sunday, May 20, 2012

REDO: Dragon Slayer 454

Been out in the garage working on the Corsair 308 and the Dragon Slayer 454.  Stopping a leak in the DS has been fun to say the least.  Hard to get parts.  A new LEROY RODUNER fill nipple here and a NEW O-RING there and some new parts here and she seems to be good so far.

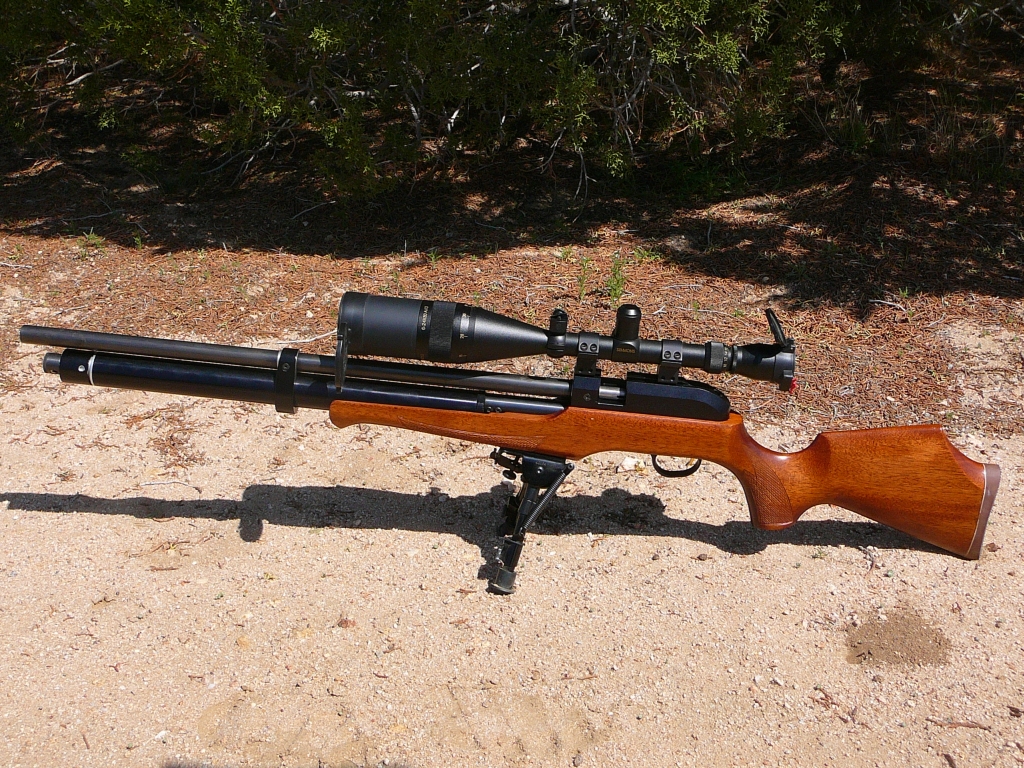
 A while back, I had a buddy machine me another hammer weight set up so the gun would now become a separate cock and load gun.  I wanted the custom hammer to be heavier than the factory hammer.  The O.E.M. hammer weighs 1.9 oz and the custom one weighs 4 oz. including cocking handle.  I also opened up the air-tube hole a tad bit more to MAX....lol.  My buddy also made me a custom DELRIN Transfer Port and we got rid of the brass TP.  I also moved the Bi-pod more forward and filled the previous stud hole with WOOD BONDO and retouched it up.  I also scrounged up a stiffer smaller spring than the one my buddy sent me.  And began trimming it too length.  Yes, the mainspring is a DUAL setup.  I also polished the heck outta the hammer and that gave me a little more FPS also.

Already got some round ball for it and i also have some Mark Whyte 175 gr Truncated Cone bullets.  Jerry Boyenga at SUREFIRE Slugs is ALSO sending me some 220 gr Raptors.  So far, from a 3000 psi fill, 454 cal Hornady Round Balls are doing 898.6-909.6-875.6, Jerry's 220 gr Raptor slugs are doing right at 700 FPS for the 1st shot but will be just a tad faster on the second shot.  More chrony work to come (gun is kinda loud in a TOWN HOME community..lol).  The 175 gr Mark Whyte bullets.......NOT SURE YET!  Haven't chronied them yet.  But they are probably gonna do about 800 FPS or so.

Some Pics.

Gun in full dress with the BI-POD moved forward for better balance:

Separate side cocking lever:

OEM vs custom hammer and springs:

Leroy Roduner MALE quick fill probe:

A 3 shot Chrony String:


Stay tuned for the next post!

Friday, April 20, 2012

3 GUN Ground Squirrel Hunt

Finally got a break in the weather and wanted to take advantage of it.  I've been testing a new gun and this would be a perfect chance to carry it afield on a shoot.  More on that gun though at a later date.  The guns were:  Dave G.-RAVEN .177, a Logun Solo .20 and a Rapid .25.  I would spend the first half of my hunting day sighting-in.  The Raven produced 2 different .660" and .700" CTC groups using the JSB Heavies.  The Solo .20 produced two .5" plus CTC groups.  The Rapid came in making a .393" CTC 5-shot group.

Raven .177 cal:

Solo .20 cal:

Rapid .25 cal:

Sighting in my Rapid .25 cal:

After the sight-in, it was time to hunt.  My longest shot of the day came from the Rapid 25 and it was a 93 yard head shot.  Nothing more satisfying than making a connecting shot at that distance with an airgun.  I managed to make shots from about 40 yards out to 93 yrds and got roughly a dozen squirrels.

The 93 yard Rapid head shot:

Raven .177-40 yards head shot:

Raven .177-49 yard head shot:

Logun Solo .20-38 yard head shot:

Logun Solo .20-40 and 51 yard head shot:

Rapid .25-40 yard head shot:

Rapid .25-57 yard neck/spine shot:

Rapid .25-61 yard shoulder shot:

Rapid .25-65 and 75 yard head shot:

THE HUNTING ACTION:


STAY TUNED!!!!
TOFAZFOU

Tuesday, April 3, 2012

My ShoeBox gets an UPGRADE!!

After hearing of a few people getting the Shoebox upgrade and being pleasantly surprised at how much quieter it was, I reviewed Tom Kaye's website (www.shoeboxcompressor.com) and read up on the "UPGRADE" parts.  Harder steel pistons and a belt drive system (quiet and low maintenance) sounds pretty good to me as BETTER is always a good thing especially when it comes to things such as high usage compressors.  So I ordered the belt drive system and the hardened steel pistons.

After my parts came in, I logged onto my computer and started reviewing Tom's DIY videos on the Shoebox website. I had easily memorized the whole process and decided to go down in the garage with new parts in hand and do the installation.  I also decided to video the process as, well, IT'S JUST WHAT I DO...lol.  It's also just to show how easy the upgrade is and its something I really had fun doing.  I love taking things apart and putting them back together especially if I'm making it BETTER....lol.

High and Low pressure Tool Steel Pistons:

Belt Drive system:

ShoeBox unit with new parts installed:


BEFORE INSTALLING PARTS ON THE SHOEBOX:
I can't stress enough (from all that I've learned of the shoebox unit) to watch Tom's DIY videos before any tear down (rebuild) or upgrade is done to your personal Shoebox.  The MAIN reason being is that the unit (shoebox) must go back together PRECISELY as to not cause leaks or brand new parts to be ruined or accelerated wear on parts or, the unit to not compress properly if at all into your SCBA/SCUBA tanks.  Upgrading/Rebuilding the Shoebox is not hard at all and it's fun, but, care must be given when tearing down and installing new parts.

The video:

My take:
I am very impressed with the upgrade parts AND the Shoebox.  I 1st must thank Tom Kaye for making the Shoebox.  It works, it's affordable, it's rebuildable, and it's compact and light.  It also gives the owner the freedom of NOT having to rely on a dive shop which can be far away and expensive (in more ways than one) and possibly not fill your tank full which I have experienced quite a few times.  The new belt drive system is waaaaayyyyyy more quiet than the chain drive and it's cleaner.  You don't have to worry about lubing a chain anymore and getting lube all over the units interior.  And the hardened pistons should provide a lot more life to the pistons which is a super PLUS.  Since the upgrade, the one thing I noticed is that when your shop compressor is ON and running, you CAN NOT HEAR the Shoebox running until the shop compressor turns off..........lol!  Wasn't that way with the chain drive unit installed.

FYI:  Just a little heads up.  If you decide to do the upgrade, while you have unit apart, NOW would be the time to do a rebuild on the cylinders (white o-rings and piston sleeves) if you've had some previous run time (a lot) on the unit.

Thanx for watching and STAY TUNED!
Tofazfou

Monday, April 2, 2012

Rapid 25 barrel shortened by 3"

Thought long and hard about having my Theoben Rapids barrel shortened.  After installing the new stock, the gun gained some length.  It barrel fit in its case now and something had to give.  Making the gun shorter and making it less front heavy by removing length from the barrel had become, "THE WAY TO GO".  So off to my gunsmith Ernie over on Airgun Advise for a little "trim".


As expected, there was a FPS loss with the barrel trimmed down. The gun was set up to push JSB Kings at 940 FPS and now with the 3"s removed, velocity is around 910 FPS. I have yet to RE-TUNE the gun as I wanted to see if the gun/barrel would remain as accurate with the barrel shortened at the current power setting. It still shoots great but has lost just a tad of the accuracy but again, that's expected now as the FPS has changed. So again, more tuning and testing to come. But, I was able to still smack eggs at 100 yards while placing the eggs or their sides instead of standing them up. Much smaller target that way......lol.

With the switch of the stock and a shorter barrel and also the smaller 400cc bottle, the gun is no longer front heavy and is more balanced.


The rifle before the barrel trim: 

My Rapid wearing its shorter barrel:


Here is a pic of the 3" of barrel removed:
 
Here is a pic of the barrels new OVAL port that Ernie machined:


Here is a pic of my barrel and my buddies barrel after Ernie worked his magic:

1st group shot with JSB Kings and the shorter barrel at 50 yards. The target dots are exactly 5/8" and the 1st shot pushed it through the Styrofoam plate:

VIDEO: A short range session 

Stay TUNED!!
Tofazfou


Thursday, February 9, 2012

Making/Testing Ballistics gel for Air Guns

Ok guys, 1st off, i have to say that in no way shape or form do i consider this REAL Ballistics Gelatine.  Ive never seen nor handled the real stuff so, i truly don't know how close in density and elasticity this stuff comes to the real thing.  I got the recipe from YOUTUBE.....of course!....lol.

Also:  THIS IS NOT JELLO BRAND GELATIN.  THIS IS GENERIC or PLAIN GELATIN.  This stuff is more dense and tougher.

Anyways, i have to say though, not only was this project very fun and entertaining but i learned a couple of things.  1st is, how to reheat (low fire/temperature on the stove instead of medium or high) this stuff to keep it clearer longer and to not use Pam or cooking oil as a release agent.  I simply NOW put it in a container of choice for the shape with no release agent and slowly peel the top edges away from the container all the way around and VOILA!.  Seems to stay clearer longer than when you add oils as instructed on You Tube as a release agent.  2nd, using this recipe only cost whatever your store charges for 8oz of gelatin.  Mine only cost 5.98 plus tax.  So it's cheaper than the real thing and easy to handle and mix and cure.  3rd, the mixture is STRONG ENOUGH TO STOP A 50 FPE JSB KING in ONLY 13" from a mere 30 feet away!  But of course, always use a GOOD BACKSTOP!

Guns used in test:  Rapid .25 and Cros Mods Disco .22

Pellets tested:
.22 cal JSB Exact-15.9 gr @ 908 fps/29.1 FPE
.22 cal Predator-16.0 gr @ 916 fps/29.8 FPE
.25 cal JSB Kings-25.4 gr @ 940 fps/49.8 FPE
.25 cal Predator-26 gr @ 946.8 fps/51.7 FPE

The results from all the pellets were as expected.  I knew the Predators would drop the poly-tip and then expand pretty good and i knew the Exacts and Kings would penetrate like the dickens.  Actual hunting time in the field has shown me this.  I find poly-tips in animals and a lot of bruised tissue while with the Exacts and Kings, well, I've never found one inside of quarry..lol.  What i did not expect was for the gelatin to actually stop the Kings and Exacts in 12-13" of penetration.  This stuff works better than i thought it would.  Especially that i was only about 30 feet away.  I also did not expect to actually capture the wound channel along with the SPIRALING EFFECT.  And the gelatin showed exactly what DOES happen when it hits flesh, the domes create a much narrower wound channel and penetrate further than the HP pellets.  The Predators also mushroomed perfectly and tracked very straight as i traveled inside the gelatin.  Again, I've never seen a Predator hit in one place then come out somewhere totally opposite from the entrance.

FYI:  Please forgive the 25 cal test which was the first in the video to be done but the gelatine came out darker (more orange) cause of the repeated use of oils as a release agent and high remelting temps.  But you can still see the pellet travel through the gelatin.  The .22 cal testing portion of the video came out a lot better as i bought more gelatin and rethought the process and rethought the filming.  So excuse that as it was all trial and error (1st time) caught on video...lol.  But for the next video, i will use the OVERHEAD video technique as well as smarter lighting like in the .22 portion (used a clear plastic box lid with a halogen light underneath to illuminate).  BTW, ILLUMINATING (lighting) is the most important part of filming to get good footage for those of you that wanna try this and film it for yourselves.

Enough of my yappin...............................................

ENJOY THE VIDEO:


Monday, December 26, 2011

AIRGUN MAINTENANCE: Fixing Dragon Slayer 454 leak


Every once in a while we have to stop shooting so much and actually do some much deserved "MAINTENANCE" on our hardware (airguns).....lol.  I had been wanting to shoot my tried and true Dragon Slayer 454 for some time now and i finally got around to ordering some 150 gr. EPP/UG's as recommended by my buddy Chris Butcher for it to test and while i waited on those to come in, i located the case with the Slayer in it and wanted to clean the barrel and to check for any leaks.  Its probably been over a year since i last shot it and no time like the present to check the gun out and prepare it for it's upcoming outing.  Thank God i did cause upon opening the case, i found the guns reservoir to be empty.


Before trying to fix the gun, i right then and there decided that i wanted to also install a NEW FILL NIPPLE from Leroy Roduner at BGMF Airguns.com to make filling the gun much more simple.  His part not only takes away the leaky and horrible fill probe that comes with the gun but it also came with a screw on cap to keep out dust and other things that would otherwise clog up the fill port while filling the gun while outdoors.  A very nice feature to say the least and a very well made part.  Getting rid of fill probes is so nice....lol.


Upon filling the gun again then straining off the air inside the fill whip line, i could hear the DS (Dragon Slayer) leaking back through the OEM fill port.  This is a very common problem with the Slayer line of Korean guns.  No problem though as i had done this before.  So now i drain the air tube by shooting the remainder of the air out of the tube.  I then remove the fill housing from the gun and begin to disassemble it to get to the check valve.  Once apart, i used denatured alcohol on the inside to remove any oil/debris and to in general clean the check valve seat.  I then remove the check valve seal and i visibly see wear on the face of that seal so i decided that flipping it over would be the "QUICK FIX".  And if it leaked still, i could try and order the part through Pyramid air or have one made.


I then decide that while the gauge/fill port assembly was apart, i might as well replace the o-rings on the assembly as well as on the opposite end of the air tube as well.  My profession has taught me that when something like RUBBER (orings) has been under pressure for years then all of a sudden that vessel looses all pressure, those orings should be replaced before putting the item in question (guns airtube) back together.  Rubber changes when its been under extreme pressure and heat and tend to become harders and more brittle.  So change it is.

While the air tube was off, i decided to go ahead and also remove the valve stem and attempt to clean the valve seat with alcohol also.  I also replace the o-rings on the bolt probe as, well, i thought, WHY NOT...lol.  This would be all the maintenance that i performed on the gun and this should put it back in service for at least the next couple of years if not longer.  These fixes/preventative maintenance items are reasonably easy and inexpensive as they only cost you the price of o-rings and a little time.  Nothing last forever and these parts are under enormous stress and are necessary at times when you own PCP's.  As a matter of fact, seals are part of every major type of airgun as seals are the KEY when storing and capturing and expelling high pressure air.  Springers, PCP's, Pump Pneumatics, and CO2 guns all have them and should be replaced when worn.

Fill port (OEM, BEFORE):
Fill nipple (LR, AFTER):

The gun as of now has been holding EXACT pressure for some time now (12 hours) which is a LOT longer than it was before i started the maintenance.  The LR male fill connector is a great addition and a very well made item.  It now makes my Dragon Slayer what i call STANDARD meaning that all i need to fill the gun is the female end of the fill hose.  No more fill probes and no more leaks.


STAY TUNED!!


Tuesday, October 18, 2011

New CAMO stock for my Theoben Rapid .25 (PIC HEAVY)

Not too much to say about this one except, I'M EXTREMELY HAPPY with this stock that Ernie Ohlsen (aka SWIFT 220) over on www.airgunadvise.com did for me.  He has done only a couple to a few stocks before and upon looking at the very first one that he did for himself, i knew i wanted him to make me one.  He gladly agreed to do a stock for me and my Rapid .25.  All that i had to do was to pick the wood that i wanted and send it to him and he would do the rest.  I choose a CAMO LAMINATE as my choice.  This gun IS and will remain a field hunter.  I purchased the laminate blank from Boyd's Gun Stocks and it is no longer offered with this particular color pattern.  The stock also comes with a black Morgan adjustable butt pad, swivel studs in the forearm as well as the butt stock, a quick fill dust cover complete with brass insert and a stock mounting screw with brass insert.  Ernie also included and installed brass inserts for the swivel studs also.  In the pictures below, you will see the inserts as well as more detail.  What an eye Ernie.  Details also include oval recesses on both sides of the forearm for you finger when shooting offhand, flared tip that contour along the air tank (bottle), high cheek rest, finger grooved pistol grip with the butt of the pistol grip widened, lots of room (just enough) in the thumb hole for the biggest thumbs around..lol, and the above mentioned inserts and trinkets.

Long Story shorter i would love to thank Ernie for doing such a great looking stock with a ton of character and detail and to also thank Dave G. for his recommendation...........

The stock UNFINISHED:

The stock FINISHED (Min-Wax Polyurethane):


Gun and Stock goodies: